TorchProtein is built on top of TorchDrug to facilitate protein science with machine learning techniques from multiple aspects.
- Represent the protein sequence and structure with a unified data structure which supports GPU acceleration
- Define extensive and flexible building blocks for the rapid prototyping of machine learning solutions to diverse protein tasks
- Empower protein representation learning related applications with comprehensive benchmarks and a protein model zoo
Before we start, make sure you are familiar with TorchDrug. Check out the overview of TorchDrug.
Proteins
Protein Data Structure
In TorchProtein, a protein is viewed as a special case of the general graph in TorchDrug, since either the primary structure (i.e., amino acid sequence) or the tertiary structure (i.e., 3D folded structure) of a protein can be viewed as a graph with atom or residue as nodes and different edge construction methods. For example, we can construct a protein from PDB file. PDB is a standard data format that describes the protein structure.
import torchdrug as td
from torchdrug import data, utils

pdb_file = utils.download("https://files.rcsb.org/download/2LWZ.pdb", "./")
protein = data.Protein.from_pdb(pdb_file, atom_feature="position", bond_feature="length", residue_feature="symbol")
print(protein)
Protein(num_atom=445, num_bond=916, num_residue=57)
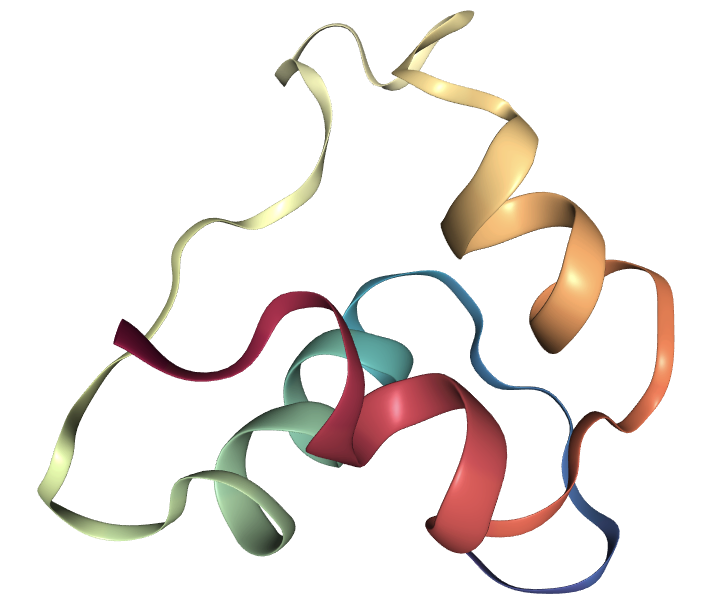
The protein data structure stores all information needed to recover a protein. We show the recovery of single-chain Insulin (PDB id: 2LWZ) as below.
from rdkit import Chem
import nglview

protein.to_pdb("new_2LWZ.pdb")
mol = Chem.MolFromPDBFile("new_2LWZ.pdb")
view = nglview.show_rdkit(mol)
view
We can easily extract the amino acid sequence from the protein data and construct another protein data with only sequence information.
aa_seq = protein.to_sequence()
print(aa_seq)
seq_protein = data.Protein.from_sequence(aa_seq, atom_feature="symbol", bond_feature="length", residue_feature="symbol")
print(seq_protein)
FVNQHLCGSDLVEALYLVCGERGFFYTDPTGGGPRRGIVEQCCHSICSLYQLENYCN
Protein(num_atom=445, num_bond=910, num_residue=57)
Protein Operations
To fully utilize the hardware, TorchProtein supports to process multiple proteins as a batch, and the batch can switch between CPUs and GPUs using cpu() and cuda() methods.
proteins = [protein] * 3
proteins = data.Protein.pack(proteins)
proteins = proteins.cuda()
print(proteins)
PackedProtein(batch_size=3, num_atoms=[445, 445, 445], num_bonds=[916, 916, 916], num_residues=[57, 57, 57], device='cuda:0')
Just like original PyTorch tensors, proteins support a wide range of indexing operations. Typical usages include applying atom masking, residue masking, edge masking or protein masking. The following example shows how to select two consecutive residues from the start, and the selected protein segments can be visualized as molecular graphs. For more protein operations, please see the tutorial.
segments = [protein[:2], protein[2:4], protein[4:6], protein[6:8]]
segments = data.Protein.pack(segments)
segments.visualize()
Dynamic Graph Construction
The raw protein data constructed in TorchProtein contains only four types of bond edges (i.e., single, double, triple or aromatic). To fully utilize the rich structural information of proteins, TorchProtein provides a mechanism to dynamically reconstruct the protein graph.
First, we reduce the size of the original atom-level graph by picking out only Alpha carbons from the protein, which induces a residue-level graph. Then, we add spatial, KNN and sequential edges to the residue-level graph to model the spatial and sequential adjacency between residues.
from torchdrug import layers
from torchdrug.layers import geometry

graph_construction_model = layers.GraphConstruction(node_layers=[geometry.AlphaCarbonNode()],
                                                    edge_layers=[geometry.SpatialEdge(distance=10.0, sequence_distance=5),
                                                                 geometry.KNNEdge(k=10, sequence_distance=5),
                                                                 geometry.SequentialEdge(distance=2)],
                                                    edge_feature="gearnet")

_protein = data.Protein.pack([protein])
protein_ = graph_construction_model(_protein)
print("nodes before: ", _protein.num_node)
print("nodes after: ", protein_.num_node)
print("edges before: ", _protein.num_edge)
print("edges after: ", protein_.num_edge)
nodes before:  tensor(445)
nodes after:  tensor(57)
edges before:  tensor(916)
edges after:  tensor(926)
A Sequence-based Protein Property Predictor
Now we demonstrate how to create a sequence-based protein property predictor with TorchProtein. Specifically, TorchProtein provides us with a large collection of popular datasets and models for protein sequence analysis. These help us avoid writing and debugging boilerplate code.
For this tutorial, we use the Beta-lactamase dataset. This dataset requires to predict the scaled mutational fitness score of each protein.
Load and Prepare Dataset Splits
Before defining the dataset, we first define the transformations we want to perform on proteins. We consider two transformations: (1) truncating overlong protein sequences and (2) using residues features as node features. During dataset construction, we can pass the composition of these two transformations as an argument.
from torchdrug import transforms

truncate_transform = transforms.TruncateProtein(max_length=350, random=False, residue=True)
protein_view_transform = transforms.ProteinView(view="residue")
transform = transforms.Compose([truncate_transform, protein_view_transform])
Now we define the dataset with specific interface. TorchProtein will automatically download the dataset into the path you specify. We then split the dataset into pre-specified training, validation and test sets.
from torchdrug import datasets

dataset = datasets.BetaLactamase("~/protein-datasets/", residue_only=True, transform=transform)
train_set, valid_set, test_set = dataset.split()
Define a Sequence-based Model for Prediction
We define a sequence-based model to encode the protein sequences. Specifically, we use a shallow CNN with 2 hidden layers.
from torchdrug import core, models, tasks

model = models.ProteinCNN(input_dim=21, hidden_dims=[1024, 1024],
                          kernel_size=5, padding=2, readout="max")
Note the model is simply a neural network without any training target. To adapt it for Beta-lactamase activity prediction, we wrap it with a property prediction module. We define this task by the mean squared error (MSE) criterion.
task = tasks.PropertyPrediction(model, task=dataset.tasks,
                                criterion="mse", metric=("mae", "rmse", "spearmanr"),
                                normalization=False, num_mlp_layer=2)
Training and Evaluation
We create an optimizer for the parameters in the task, and combine everything into core.Engine.
The engine provides convenient routines for training and evaluation.
In the case that a single GPU is available, the whole procedure is as below.
import torch

optimizer = torch.optim.Adam(task.parameters(), lr=1e-4)
solver = core.Engine(task, train_set, valid_set, test_set, optimizer, batch_size=64, gpus=[0])
solver.train(num_epoch=100)
solver.evaluate("valid")
More acceleration can be achieved by multiple GPUs.
For example, when 4 GPUs are used, we need to launch the script by prepending python -m torch.distributed.launch --nproc_per_node=4.
solver = core.Engine(task, train_set, valid_set, test_set, optimizer, batch_size=64, gpus=[0, 1, 2, 3])
Save and Load
Let’s save our trained model. We dump our model into two parts, where beta_cnn.json contains the hyperparameters,
and beta_cnn.pth contains the trained weights.
import json

with open("beta_cnn.json", "w") as fout:
    json.dump(solver.config_dict(), fout)
solver.save("beta_cnn.pth")
To load a pre-trained model, we don’t bother to define the model again. Use core.Configurable.load_config_dict
and TorchProtein will automatically parse the model from the hyperparameters.
with open("beta_cnn.json", "r") as fin:
    solver = core.Configurable.load_config_dict(json.load(fin))
solver.load("beta_cnn.pth")
A Structure-based Protein Property Predictor
Following the principle that “the structures of proteins determines their functions”, TorchProtein also provides popular datasets and models for protein structure analysis. Now we illustrate how to create a structure-based protein property predictor with TorchProtein.
For this tutorial, we use the Enzyme Commission dataset. This dataset requires to predict multiple binary functional terms of each protein.
Load and Prepare Dataset Splits
Similar to the definition of sequence-based dataset, we will pass a pre-defined transformation function to the dataset interface. The dataset will be automatically downloaded and be split according to pre-specified dataset splits.
dataset = datasets.EnzymeCommission("~/protein-datasets/", transform=transform)
train_set, valid_set, test_set = dataset.split()
Define a Structure-based Model for Prediction
We define a structure-based model to encode the protein structures. Specifically, we use a 6-layer GearNet-Edge which is a superior protein structure encoder equipped with relational and edge message passing.
model = models.GearNet(input_dim=21, hidden_dims=[512, 512, 512, 512, 512, 512],
                       num_relation=7, edge_input_dim=59, num_angle_bin=8,
                       batch_norm=True, concat_hidden=True, short_cut=True, readout="sum")
Similarly, we wrap this encoder together with the graph construction model into the multiple binary classification module and define the task with binary cross entropy loss.
task = tasks.MultipleBinaryClassification(model, graph_construction_model=graph_construction_model, num_mlp_layer=3,
                                          task=[_ for _ in range(len(dataset.tasks))], criterion="bce", metric=["auprc@micro", "f1_max"])
Training and Evaluation
We build an optimizer for the whole model and combine everything into an engine. By using a single GPU, the training and evaluation on this task are performed as below.
optimizer = torch.optim.Adam(task.parameters(), lr=1e-4)
solver = core.Engine(task, train_set, valid_set, test_set, optimizer, batch_size=4, gpus=[0])
solver.train(num_epoch=100)
solver.evaluate("valid")
Note. We can use the same schemes as those in the sequence-based task to save and load models.